 Ircle Setup Guide
original version by Jolo at http://www.irchelp.org/irchelp/mac/ircle_setup.html
last updated 11/24/97
(for version 3.0b9 but later versions are still similar)
Note: these instructions are for Ircle version 3.x only. They do not apply to earlier versions.
[ back to Mac IRC page | Ircle home page | download Ircle ]
This page has many illustrations and it may take >30 seconds to load them all over a modem connection.
Ircle is the gold standard among Mac IRC clients because it is by far the smallest, least laggy, most updated, and most stable. If you think Ircle looked ugly or was buggy, you probably haven’t seen a modern version. Ircle is easy to use, plus it supports the full set of standard IRC commands and some very cool non-standard features too. Ircle is $15 shareware and well worth it! The following is an idiot-proof, illustrated, step by step guide to setting it up. The author of Ircle now also has an official setup guide that is a little shorter.
Step 0. Setting up your Mac for the Internet
Make sure your Mac has the appropriate software (either MacTCP or OpenTranspo rt) and has a connection directly to the Ethernet or indirectly via a modem and dial-up account from an Internet service provider (ISP). If you can use Netscape or MS Internet Explorer with your Mac, for example, you’re ready. Download the latest version of Ircle (see links at top of page) and if necessary, uncompress it with StuffIt Expander.
Step 1. Launching Ircle.
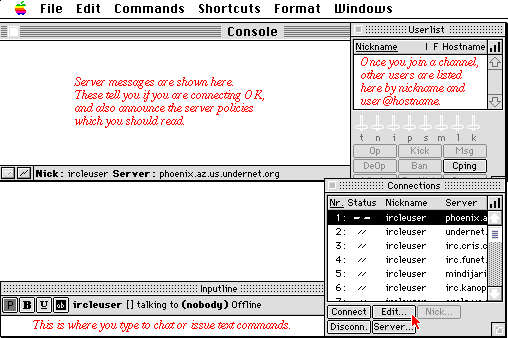
Launch Ircle by double-clicking on the icon called ircle3.0bUS or something like that - it’ll be the only one called “ircle”-something. You will then see the following array of windows. To get connected, highlight the first line from the Connection window if it isn’t already and click Edit (as shown by the red arrow).
Step 2. Setting up your personal information
This opens up a new Connection preferences window. Enter your nickname (your online “handle”), username (typically the part that precedes the “@” in your email address, or make up something short, lower case, with no weird characters), and your real name (or make up whatever you want people to see). By default the server has been set to phoenix.az.us.undernet.org which is a server on the “Undernet” - 1 of the 4 major networks. If this is your first time, you can just click OK and proceed to step #6 below to connect to that server. If however you want to select a different server/port combination such as to explore some of the other networks or to meet a friend on a specific server, click on the Select button (as shown by the red arrow) and go to the next step.
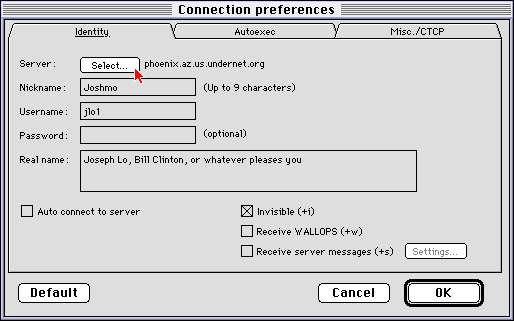
Note: you can check Auto connect to server if you want Ircle to automatically make this connection when it is launched. You can check Invisible so people not on the same channels as you cannot find you as easily, this will give you more privacy and help to avoid unsolicited ads or attacks.
Step 3. Selecting a server from the list
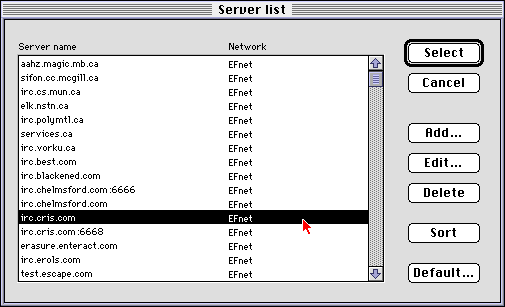
This opens up the Server list window, where you can select a different server or port number. For example, scroll to the top to see a list of servers for EFnet North America, the biggest IRC network. In the figure below I selected irc.cris.com. Now click Select to accept that change.
Step 4. Adding a new server to the list
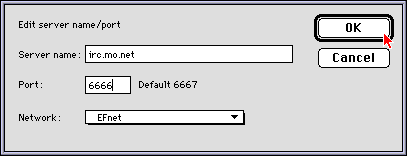
This skill is important, because IRC servers come and go constantly. Many of the servers in Ircle’s default list are in fact defunct. For an up to date list, check out our IRC networks and servers page at http://www.irchelp.org/networks/. Say you want to meet a friend on a special server that is not shown in the list, just click Add. If you want to edit an existing entry such as to keep the server name but change the port number from the default 6667 to speed up connecting, just select the entry and click Edit. Either button brings up the Edit server name/port window shown below. Just enter the server and port, such as irc.mo.net and 6666 as shown below. If you know the network name like “EFnet” go ahead and select it in the popup menu, if not don’t worry about it. Finally click OK. This returns you to the Server list window where you can click Select to use your new or edited server.
Step 5. Miscellaneous personal information
This part is optional. To personalize your copy of Ircle, return to the Connection preferences window (previously described in Step 2) and click on the tab on top labelled Misc./CTCP and fill in the blanks with anything you like. These replies are given when others query you with the /ctcp yournick finger or /ctcp yournick userinfo commands.
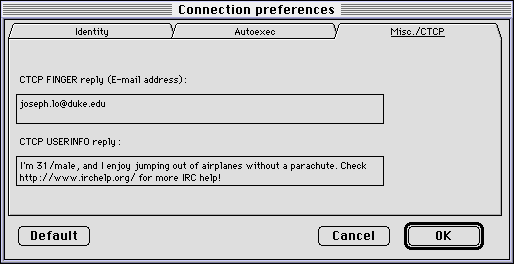
Note: the Autoexec tab (between the Identity and Misc./CTCP tabs) will let you enter startup IRC commands that you routinely type when you first connect to IRC, such as /join #my_favorite_channel.
Step 6. Connecting to IRC
You are now ready to connect to IRC. Close the Connection preferences window, you are now back to the initial palette of windows shown below, except the first line in your Connections window now has your proper nickname and the new server if you specified one (in my case, Joshmo and irc.mo.net) . Make sure that line is highlighted and click on the little Connect button (where the red arrow is)… voila, now you’re on IRC! Note the lines spewing by in the Console window as Ircle connects to the server and they exchange some information. When the connection has been made, the status picture in the Connections window changes to a unbroken line with the little color arrows. Before you go further, select Save preferences under the File menu so you won’t have to redo these steps in the future.
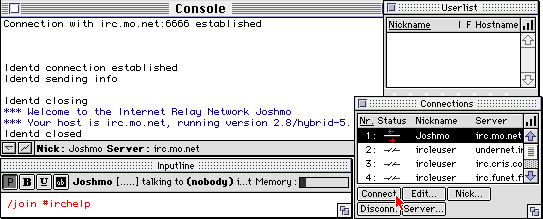
What are those Console messages? The identd is a way to confirm your identity (the username and your machine’s IP address). After the connection is made, the server tells you how many people are connected to this network, how many channels there are, etc., plus a message of the day which contains important policies and announcements.
Step 7. Chatting
You can now issue all standard IRC commands – for a quick introduction, check out the Command Reference in the Help Menu (near the upper right corner of your screen, the thing with the Apple Guide and Balloon Help) or see the very short introductory guide at http://www.irchelp.org/irchelp/new2irc.html written by the knowledgeable helpers of the #irchelp channel on EFnet. In the figure above, I typed “/join #irchelp” (text shown in red for emphasis only) to join that channel, and a new window appeared. The channel name and server are shown on top (#irchelp: irc.mo.net) while the channel topic is shown on the bottom (Topic: Ask your IRC question etc.). To chat, I just type into the bottom Inputline window.
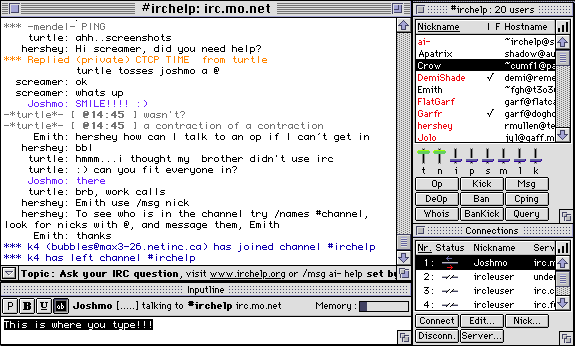
What are all these windows? The chatting is in the big window - purple for my speech, black for everybody else’s speech, red for private messages, blue for miscellaneous crap like people coming or going, etc. The people in this channel are listed in the Userlist window. The red nicks are operators or “ops” who run the channel. The channel modes (green and purple switches in the Userlist window) are +tn. Since I am an op on this channel, all the buttons for kick, ban, etc. are activated. For more information on all this stuff, see the introductory guide mentioned above.
Step 8. Advanced customization
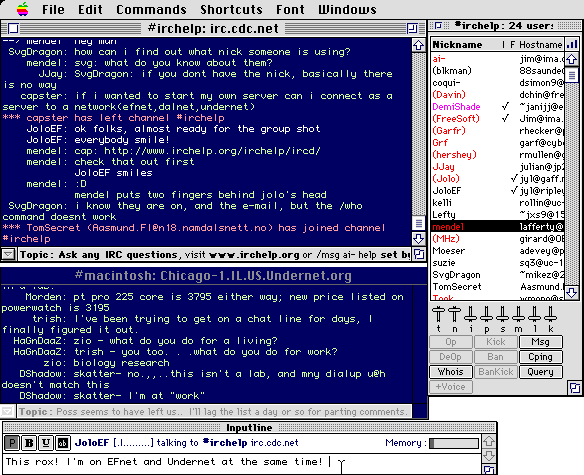
The following is an example of a more advanced setup. You can customize Ircle to have arbitrary colors, sounds, and fonts. Here I’ve changed the colors and established simultaneous connections to 2 channels on different networks (EFnet’s #irchelp and Undernet’s #macintosh).
Step 9. Quitting.
You can disconnect from any server by selecting its line in the Connections window and clicking Disconnect. To quit Ircle, just select Quit under the File menu. You can enter an optional farewell message which will be sent to all channels you are on. If you’ve made further changes to the preferences, go ahead and save them when prompted to do so. That’s it! Oh, don’t forget to register your Ircle to encourage the author to continue his excellent work.
If you have any other questions, visit the Ircle home page at http://www.ircle.com/ or email us using the web form below (be sure to select the Mac helper).